I have been uploading photos to Flickr for awhile, but I just recently started to USE Flickr when I was accepted into a Flickr group called "52 weeks for dogs". Since that time, I have learned a few of the other features besides just how to upload and organize photos into sets. I searched Flickr and found this set of FAQ's that are helpful, but they don't seem complete to me. ( http://www.flickr.com/help/general/) There is a drop down menu at the bottom of the page to other sections too. They tell you about a feature, but not how to find it. So hopefully this post will help you learn some of the stuff I have been struggling to find and figure it out on my own. Screen shots are from my own account at: (http://www.flickr.com/photos/scoutdogs/)
I do have a "pro" account (which means I paid $24.95 for a year). I know it gets me unlimited space for my photos, but I don't know what other features I might have that a free account doesn't. So if something looks different on your free account, that might be why.
Note: you can click on photos in my blog to make them a bit bigger
Above is the screen I see when I go to my Flickr account. I added some numbers in red for reference as I talk about various features. Here's an overview of what you can access on this page:
#1) Home - This is a good place to get started if you are new to Flickr and might be the page you see when you first start. From this page, you can Personalize your profile, upload photos, and find friends. It will also show you some recent photos you have added to your "photostream", will show you recent photos from any contacts you may have and recent photos from any groups you belong to.

#2) You - This link takes you to many features and lets you access all YOUR stuff. If you aren't seeing a page that looks like the one above, the page you ARE on will likely still show you items 1-8 above. Click on "you" (#2) and it will take you to your photostream (which should look something like the page above). By clicking on the little down arrow next to "You" (#2) you can see a menu of features. This includes:
- Your Photostream- This is all the photos you have uploaded
- Your sets- groups of photos that have a similar theme or something else in common (determined by you)
- Your collections- groups of sets
- Your galleries- Photos from other people that you want to put in a "gallery" on your Flickr page
- Your archives- Your uploading history (this makes it easier to find an older photo if you know when you uploaded it)
- Your tags- Another way to locate your photos if you have added "tags" (keywords) related to the photo
- Your map- This is not a feature I have used. I think you can drag/drop photos in the organize/create feature onto a map to show where they were taken. Nice for general reference or for vacation photos
- Your favorites- you can mark other people's photos as a favorite and then find them again here
- Your stats- this is something you can activate and it gives you data on what photos other people have been viewing on your page.
- Your apps- Another feature I haven't used
- Recent activity- this is VERY HELPFUL to view comments made on your photos and replies to comments you have made on other people's photos.
- Photos of you- these are photos that you or someone else has "tagged" you in
- Upload photos and video- It's faster to just use the upload link (#7 in the reference photo above)
- Your account- allows you to edit:
- your personal info
- what photo appears next to your name (your "buddy icon")
- your screen name
- your profile information
- What your photostream page looks like
- privacy settings
- who can see what you post
- who can copy your photos
- who can add you to a photo
- who can put your photos in their "gallery"
- If your Exif data is displayed
- who can see your profile
- privacy defaults for new uploads
- and more
- Emails and notifications tab allows you to decide who can contact you and what Flickr sends you emails about, like:
- new photos posted by your contacts
- comments made on your photos
- when someone sends you a message
- and more
- The sharing and extending tab lets you connect your Flicker account with Facebook, twitter, a blog and more. This means that each time you upload a photo, it also gets posted to those other accounts.
- Your profile- allows you to tell others about yourself. How much you share and who can see it is up to you.
- Your Flickr Mail- Note that the icon marked above as #8 is a faster and esier way to access your Flickr email.
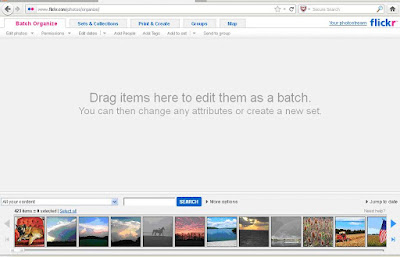
#3) Organize and create- This is where you can organize the photos and videos that you upload. Clicking on the down arrow next to Organize and create lets you access the tabs on that page directly. You'll see a main box and the photos you have uploaded in a "filmstrip" at the bottom. This page doesn't have the usual links at the top, so you'll have to use the "back" arrow to get back to your main page. Or click on "your Photostream" at the top right of the page.
Batch organize tab- This lets you work on photos several at a time. You can drag photos from the filmstrip into the main work area, and then use the links near the top of the work area to edit the chosen photos (edit photos, permissions, edit dates, add (tag) people, add tags (key words), add to set (allows you to add several photos at once to a set), send to group (if you belong to a group on Flickr, you can use this to send one or more photos directly to the group.
Sets and collections tab- This lets you click on the title of a set or collection and arrange and organize the photos within that set or collection. You can drag photos from the filmstrip into the set folder, change the order of the photos within the set and drag a photo to the folder photo over the set description text box. By dragging and dropping a photo into that box, it will change which photo shows on your photostream (if you have chosen to display your sets). You can change the title of the set and it's description too. IMPORTANT! If you make ANY changes, you have to click on the "save" button under the description to make those changes stay.
Delete a set- If you want to delete a set, you'll find the link to do that right under the tabs at the top of the work area.
Also in that area, be sure to click on the drop down arrows to get more features for arranging and editing the photos in your set or collection.
Print and create tab- Flickr has many options you can use to have your photos printed or turned into creative things like cards, photo books and calendars.
Groups tab- another way to drag/drop your photos to a group you belong to.
Map tab- I think this allows you to drag and drop photos from the filmstrip onto the map to show where they were taken. You can use the slider bar on the right to zoom in or out on the map. You can set the default privacy controls and then if you want to, you can change the privacy controls for individual photos.
#4 Contacts - Use the drop down arrow to see
- the most recent uploads that your contacts have made
- photos your contacts are "tagged" in
- your list of contacts (you can also block people from here)
- find people you may know
- invite people you know to be a contact
- see your history of invitations
- invite a non-Flickr member to see your photos
- to pay for a Flickr account for someone
#5 Groups - Allows you to see:
- The groups you belong to
- Recent Changes- Helpful! This allows you to see the new discussions and new posts/replies. If you click on the part that says how many replies there are, it will take you to the start of the new comments.
- Search for a group- put in any topic and odds are good there is a Flickr group related to that topic. Some groups are open to anyone to join, others require approval before you can participate. And if you don't find what you are looking for, you can create a new group.
#6 Explore - This is your link to other places on Flickr. The first few items are the "Explore" links. I'm not really sure how this works, but I think it might be the top "favorite" photos? However these are selected, it's a lot of really fantastic photos! If you want to get lost for awhile in great photos, just take a stroll! Most of the other features on this menu I haven't explored, but they seem self-explanatory.
#7 Upload - This is a quick link to the photo uploader tool
#8 Mail icon - If this is lit up with a number next to it, you have messages waiting to be read. Click on the envelope to go to the Flickr mail page. Here you can see your "inbox", your contacts history and messages you have sent. You can also click on "compose a new message". In the "to" box, put any letter of the recipient's screen name to get a list of potential contacts to pop up.
Items 9-17 are quick links
#9 Collections - takes you to any collections you have (groups of various sets)
#10 Sets - groups of individual photos
#11 Galleries - If you don't have any galleries created, you'll see a link to how to set one up. These are collections you have made of other people's photos. Helpful! This page also lets you see if any of your photos are in other people's galleries.
#12 Tags - allows you to see and search the tags (key words) you have put on your photos.
#13 People - These are photos in which you have "tagged" (added) names of the subjects in your photos. If you take a photo of someone you know and they are a flickr member and you know their screen name, you can add them on the photo and that photo will appear when you click on the "people" link.
#14 Archives - your upload history
#15 Favorites - other people's photos you have marked as your favorites
#16 Popular - your most popular photos based on the number of times they have been viewed by others
#17 Profile - quick link to your profile page.
#18 Sets - This is a quick link to your sets. Depending on how you choose to have your photostream page displayed, this may or may not be visible.
OTHER TIPS AND TRICKS
When you open one of your photos, you have many options:
Above the photo on the left side you'll see a drop down arrow next to "actions". This lets you:
- Add a tag (key words)
- Add a note
- Add a person (if the photo is of yourself or someone you know)
- Add the photo to your map
- Add or remove the photo from a set
- Add it to a group (that you belong to)
- View it in different sizes (where you can also order prints)
- View it as part of a slideshow of your photo stream
- View the Exif data for the photo (helpful if someone asks questions about what settings you used to shoot the photo or if you want to keep a record of that data)
- Order prints and other photo products from Flickr
- Rotate the photo
- Edit the photo using a product partner called "picnik" that has several features (Important! Don't forget to use the "save" button!)
- Edit the photo title, tags and dates
- Replace the photo with a new one (Helpful if you edit the original photo and want to replace the older version with a newer version without having to re-add it to groups and add the title and description info again.)
- Delete the photo (Note! This removes it from Flickr all together) If you want to remove it from a set, use the "organize and create" feature.
On the page of an open photo, you'll also see (to the right of the photo):
- What camera was used to take the photo and when it was taken (if the camera provides that data and the date is correctly set in the camera)
- Where it was taken (if you provide that info)
- If the photo is in any sets or collections
- A quick link to add tags (key words)
- The privacy settings you have for the photo and a link to change the settings
Below the photo you'll see any comments viewers have left for you and you can also use the comment box to reply or add additional info.
Photo titles and descriptions- If you want to change the photo title or description, just open the photo and click on them and make the changes. Don't forget to hit the "save" button! You can also change the titles and descriptions of a group of photos using the "organize and create" page.
Groups:
Groups are where photographers with a similar interest get together to share photos of that interest. See above for how to find groups you might want to join or watch. Once you join a few groups, your photos will get more exposure to others and you'll get more comments on them. It's also lots of fun to "meet" other people with similar interests and see their photos.
Group pool- The main "photostream" of a group is called a Group pool. I'm guessing all groups have a quick link to the group pool page where you'll see the photos that were most recently uploaded by group members. There is a "more photos" link at the bottom right that will take you to more of the photos in the order they were uploaded.
Touring photos- If you click on one of the photos, you can use the "newer" and "older" buttons at the top right above the photo to scroll through others. This works on an individual's page too.
What you can do with other people's photos- At the top left of their photo, you'll see other options like marking it as a favorite. Under actions you can: add it to your gallery, view it in various sizes, see the EXIF data, and view the photos as a slideshow. Under share you can: share the photo through email, facebook or twitter if the person has allowed that.
Seeing it bigger/ viewing on black- If you click on the image, you can see it a bit larger with a black background (same with any image on Flickr). Some photos look much better on black. Then you can use the "older/newer" buttons to see all the photos in that set with a black background and fewer details.
Commenting- You can click on a photo and scroll down below any existing comments to find a comment box where you can leave a note for the photographer (and others) to see. If you are not a member of the group, this function may not be available to you.
Discussion- The groups I belong to have a "discussion" link on the group pool page. Discussions are like public emails that all group members can comment on. As with the photo comments, you can click on a discussion topic that interests you and you'll find a comment box at the bottom where you can add your own thoughts on the topic.
Adding a photo into a comment or discussion- To add a photo, open that photo to get the web address (starts with (http:") and copy that (hold the left mouse button while you slide your cursor over the address). When it's all highlighted, right click and select "copy". Now go to the spot where you want the photo and right click to select "paste". The link should appear. IMPORTANT! Add brackets around the link so it looks like this: [link] When you click on "post now" the photo will appear.
To make the photo larger: Open the photo on your photostream, click on "share" above the photo, select HTML and "medium 500". Copy the code in the box and paste it into your comment. The photo will be larger than if you just put brackets around the page link as described above.
Editing your discussion posts- In tiny print under your discussion post, you'll see "edit". Click on that to make changes to what you wrote.
Editing or deleting your comments- Under each comment you have made, you'll see tiny text that lets you edit or delete what you wrote.
Key board shortcuts-
When viewing a photo, if you type ? anywhere on the page it will take you to the keyboard reminder pop up below. It will also allow you access to turn on these keyboard shortcuts by check marking the little box in the upper right hand side of the pop-up box:
? Takes you to the shortcut menu above (also at the very bottom of each photo page)
Right Arrow- takes you directly to the next photo
Left arrow- Takes you directly to the previous photo
> moves the film strip to the right
< moves the film strip to the left
] (right bracket) open the next filmstrip
[ (left bracket) open the previous film strip
S moves your cursor to the search box
F allows you to instantly "Favorite" the photo
G allows you to add it to a group (if you have permission)
E allows you to add it to a set
A add to your gallery (if it's not your photo and the owner has given permission for the photo to be added to a gallery)
C puts your cursor in the comment field (nice way to quickly leave a comment without having to scroll through all the previous comments)
T Jumps to the "add a tag" field
P Jumps to the "add a person" field"
L lets you view the photo with a black background (lightbox)
That's all I have for now. I'll add new tips as I come across them. If you have found this helpful, you can let me know by sending my an email through my Flickr page: http://www.flickr.com/photos/scoutdogs/
Happy shooting!


